


Hey there, memory-making parents and teachers! Are you looking for a way to preserve those precious little hands while creating something truly special? Today I’m sharing one of our most treasured craft projects – DIY Beach Sand Handprint Keepsakes that capture the magic of summer in a way that will make your heart melt every time you look at them.
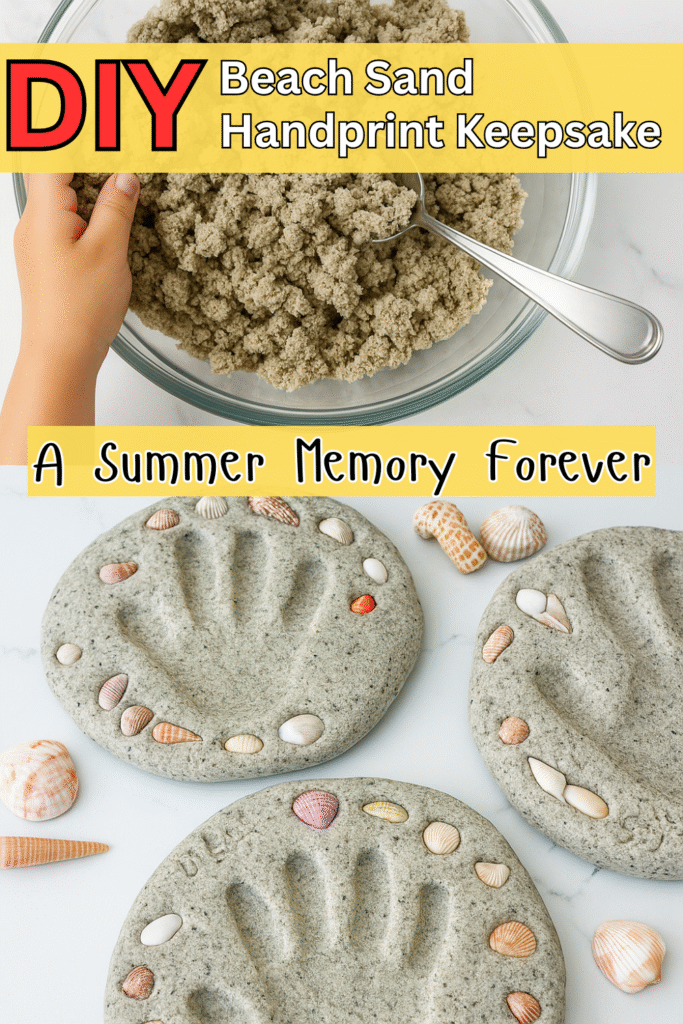
This isn’t just another handprint craft. By mixing real beach sand (or play sand) with plaster, we create beautiful, textured keepsakes that actually feel like pieces of the beach. When your little one presses their hand into the mixture, you’re not just making art – you’re freezing a moment in time that you’ll cherish forever.
I first tried this craft after a family beach vacation when my daughter was three. She kept talking about wanting to “take the beach home,” and this project was the perfect solution. Now, two years later, that little sandy handprint sits on our mantle, and every time I see it, I’m transported back to that perfect summer day. It’s suitable for ages 2 and up (with plenty of adult help for the youngest ones), and the best part? You don’t even need to live near a beach to create this coastal magic. Tiny Hands, Big Imagination – and in this case, big memories that last a lifetime!
Why You’ll Love This Craft
- Creates lasting keepsakes – These handprints will look beautiful for years to come
- Sensory-rich experience – Kids love the feeling of sand and wet plaster
- Beach memories year-round – Brings vacation vibes home, no matter the season
- Perfect for any age – From toddlers to big kids, everyone can participate
- Makes wonderful gifts – Grandparents absolutely treasure these personalized keepsakes
- Quick setting time – Results are ready in about 30 minutes
- Natural, beachy aesthetic – Looks gorgeous in any home decor style
Materials Needed
Here’s what you’ll need to create your sandy memory:
- 2 cups plaster of Paris (available at craft stores or hardware stores)
- 1 cup clean beach sand or play sand
- 1 cup cold water
- 1 large mixing bowl (disposable paper bowls work great)
- 1 wooden spoon or paint stirrer
- 1 round or square disposable plate or shallow container for molding
- Petroleum jelly or cooking spray
- Paper towels
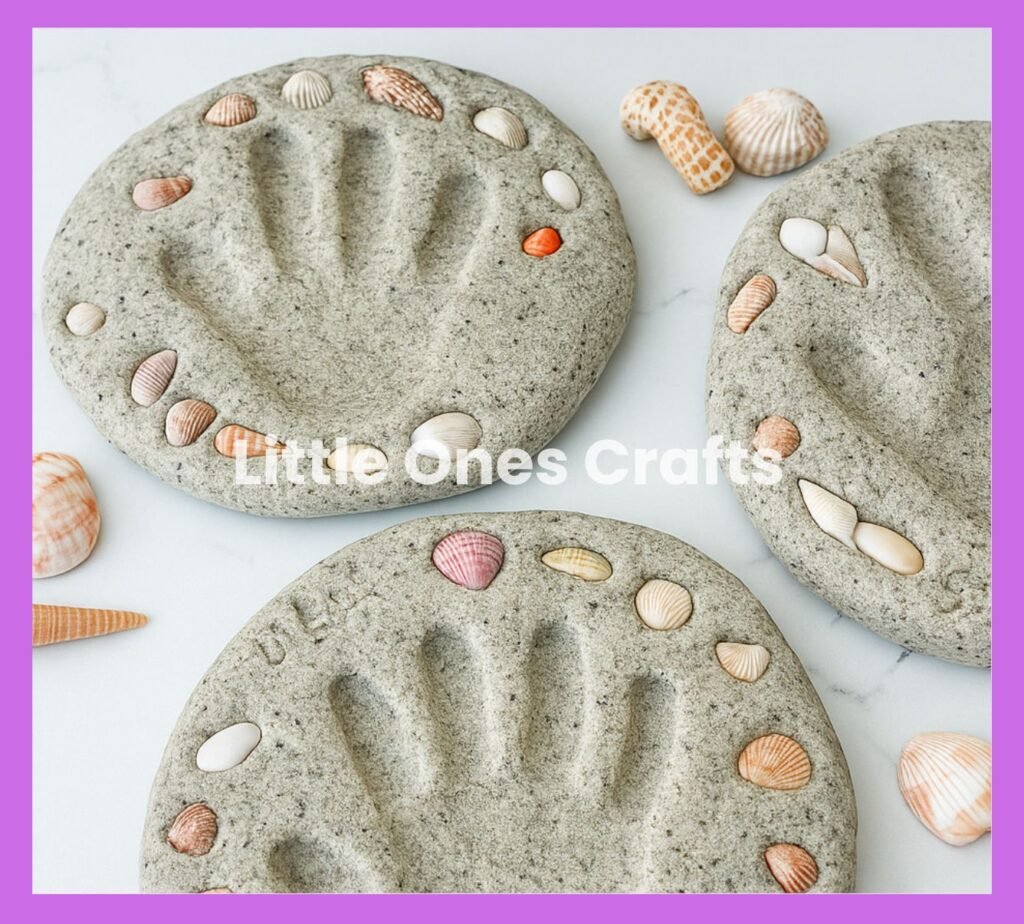
- Small seashells, sea glass, or beach treasures (optional)
- Acrylic paint in ocean colors (optional)
- Clear acrylic sealer (optional)
Easy substitutions: No beach sand? Play sand from the hardware store works perfectly and is actually cleaner. Don’t have plaster of Paris? You can use air-dry clay, though the texture will be different. No disposable plates? Line a regular plate with plastic wrap.
Instructions
1. Prepare your workspace Set up outside or in a well-ventilated area if possible – plaster can get a bit dusty. Cover your work surface with newspaper or a plastic tablecloth. Have everything within arm’s reach because once you start mixing, you’ll need to work quickly!
2. Prepare your mold Choose a plate or shallow container that’s larger than your child’s hand. Lightly coat it with petroleum jelly or cooking spray. This prevents the plaster from sticking and makes removal much easier later.
3. Mix the dry ingredients In your large mixing bowl, combine 2 cups of plaster of Paris with 1 cup of sand. Mix these dry ingredients thoroughly with your wooden spoon. Let your child help with this step – they love being involved from the beginning!
4. Add water slowly Here’s where timing becomes important. Add the cold water gradually while stirring constantly. You want a consistency similar to thick pancake batter – not too runny, but not too thick either. The mixture should pour easily but hold its shape.
5. Work quickly Plaster starts setting within 5-10 minutes, so have your child ready! Pour the mixture into your prepared mold, filling it about 1 inch thick. Give it a gentle tap to release air bubbles.
6. Create the handprint Have your child press their hand firmly into the mixture, pushing down about halfway through the thickness. Hold it steady for about 10 seconds, then carefully lift straight up. The impression should be clear and deep.
7. Add beach treasures If you want to add shells or sea glass, now’s the time! Gently press small treasures around the handprint while the plaster is still soft. This creates a beautiful beach scene around their little hand.
8. Smooth the surface Use a spoon or your finger to smooth any rough edges around the handprint. You can also create gentle waves in the sand mixture around the print for added texture.
9. Let it set Allow the keepsake to set for at least 30 minutes. You’ll know it’s ready when it feels firm and cool to the touch. Don’t rush this step – patience makes perfect keepsakes!
10. Carefully remove Once fully set, gently turn your mold upside down and tap the bottom. Your handprint should release easily. If it sticks, let it set a bit longer.
11. Clean up the edges Use fine sandpaper to smooth any rough edges if needed. The sandy texture should remain, but sharp edges can be softened for safety.
12. Optional painting If you want to add color, let the keepsake dry completely for 24 hours, then paint with ocean-themed colors. Soft blues, greens, and sandy beiges look beautiful. Let your child choose their favorite beach colors!
13. Add details Once paint is dry, you can add the child’s name and date using a fine brush or marker. This makes it even more special and helps you remember exactly when those little hands were that size.
14. Seal for protection For longevity, spray with clear acrylic sealer once everything is completely dry. This protects the surface and makes it easier to dust over the years.
Helpful Tips
For toddlers (ages 2-3): Have them wash their hands first, then guide their hand into the mixture. They might want to pull away quickly, so be ready to work fast! Sometimes making it a game helps – “Let’s make a hand sandwich in the sand!”
Classroom management: Pre-mix all the dry ingredients and have individual portions ready. This prevents chaos and ensures everyone gets their turn before the plaster sets.
Timing is everything: Have your child ready before you add the water. Once you start mixing, you have about 5 minutes of working time before the plaster becomes too firm.
Perfect consistency: The mixture should coat the spoon but still drip off. Too thick and it won’t capture fine details; too thin and it won’t hold the handprint shape.
Clean-up hack: Never pour leftover plaster down the drain! It will harden and cause plumbing problems. Instead, let it set in the bowl, then throw it away.
Weather considerations: Humid days can affect setting time. If it’s very humid, allow extra time for the plaster to cure completely.
Storage tip: These keepsakes are fairly durable but can chip if dropped. Display them somewhere safe from little hands and busy areas.
Learning Benefits
This craft is packed with learning opportunities disguised as pure fun:
Sensory development: The texture of sand and wet plaster provides rich sensory input that helps with tactile processing and awareness.
Following directions: The step-by-step process teaches kids to listen carefully and understand that some steps can’t be undone or repeated.
Understanding time: Learning that plaster “sets” introduces concepts about chemical changes and the passage of time.
Fine motor skills: Pressing their hand firmly and holding it still requires control and body awareness.
Memory making: Talking about beach experiences while creating reinforces positive memories and language development.
Science concepts: Kids observe how dry powder becomes liquid, then solid again – introducing basic chemistry concepts.
Patience and delayed gratification: Waiting for the plaster to set teaches patience, and the final result is worth the wait.
Self-awareness: Seeing their handprint helps children understand their own body and how they’re growing and changing.
FAQ and Troubleshooting
Q: My handprint didn’t come out clearly. What went wrong? A: This usually happens if the plaster was too thick or your child didn’t press down firmly enough. The mixture should be pourable but not watery, and little hands need to press down at least halfway through the thickness.
Q: Can we use regular sand from outside? A: It’s better to use clean play sand or purchased beach sand. Outdoor sand can contain bacteria, small rocks, or other debris that might affect the final result.
Q: How long will these keepsakes last? A: With proper care, these can last for decades! Keep them away from moisture and direct sunlight, and they’ll remain beautiful family treasures.
Q: My plaster started setting before we could make the handprint. Can I add more water? A: Unfortunately, no. Once plaster starts setting, adding more water won’t help. It’s better to start over with a fresh batch and work more quickly.
Q: Is this safe for my 18-month-old? A: With very close supervision, yes! Just make sure they don’t put their hands in their mouth afterward until they’re thoroughly washed. The materials are non-toxic but not meant to be eaten.
Q: Can we make footprints instead? A: Absolutely! Footprints are adorable and actually easier because feet don’t have as many small details as fingers. Just make sure your mold is large enough.
Q: What if we don’t have plaster of Paris? A: You can try air-dry clay mixed with sand, but it won’t be as durable. Some craft stores sell handprint kits that work similarly.
Q: Can we add glitter or other decorations? A: Yes! Add glitter or small decorative elements while the plaster is still wet. Just remember that less is more – you want to see the handprint clearly.
Extension Activities
The fun doesn’t have to end when your handprint is complete:
Beach memory sharing: Use the handprint as a conversation starter about favorite beach memories. What was the best part of your beach day? What did the sand feel like?
Seasonal comparisons: Make handprints at different times of year to see how much your child has grown. Create a timeline of growth using these special keepsakes.
Gift giving: These make incredible gifts for Mother’s Day, Father’s Day, or grandparents’ birthdays. Consider making multiple copies during the same session.
Beach-themed room decor: Use your handprint as the centerpiece of a beach-themed room or play area. Add shells, driftwood, and ocean colors to create a coastal vibe.
Science exploration: Talk about how beaches are formed, where sand comes from, and what lives in ocean environments. Use the handprint as a jumping-off point for learning.
Art projects: Use the handprint as inspiration for beach-themed drawings or paintings. Kids love creating whole scenes around their preserved handprint.
Storytelling: Create stories about adventures their handprint might have had at the beach. What creatures did it meet? What treasures did it find?
Creative Variations
Once you’ve mastered the basic technique, try these fun variations:
Family handprint display: Create a whole collection with different family members’ handprints in various sizes. Arrange them artistically on a wall or shelf.
Themed additions: Add small plastic sea creatures, tiny lighthouses, or miniature beach umbrellas to create whole beach scenes.
Color variations: Mix food coloring into the plaster for colored sand effects. Sunset oranges and pinks create beautiful evening beach vibes.
Texture experiments: Try different types of sand – fine sand creates smooth textures, while coarser sand gives more dramatic texture effects.
Multiple impressions: Create handprints at different ages and display them together to show growth over time.
Final Thoughts
There’s something truly magical about holding a piece of childhood in your hands. These sandy handprint keepsakes capture not just the size of little hands, but the whole feeling of beach days, summer adventures, and carefree moments that pass by all too quickly.
What I love most about this craft is how it engages all the senses while creating something permanently beautiful. The texture of the sand, the coolness of the wet plaster, the excitement of seeing the handprint emerge – it’s an experience that kids remember long after the keepsake is made.
These aren’t just crafts; they’re time capsules. Years from now, when those little hands are big and busy with grown-up things, you’ll be able to hold this sandy reminder of when they were small enough to believe in magic and simple enough to find joy in pressing their hand into wet sand.
I keep our daughter’s first beach handprint on my desk, and I’m amazed by how much joy such a simple thing can bring. Every time I look at it, I remember not just how small her hands were, but how big her smile was that day at the beach.
Whether you’re preserving memories from an actual beach vacation or just bringing a little coastal magic into your everyday life, these handprints create connections between past and present, between the fleeting moment and the lasting memory.
Want more fun crafts like this? Subscribe to our newsletter and get weekly creative ideas straight to your inbox! We’re always sharing new ways to keep little hands busy and big imaginations growing.